Wednesday, March 30, 2011

Sweet Pumpkin loaf 南瓜疏菜面包

Pumpkins Series – Part two

As mentioned in my previous post, this is the second pumpkin recipe that Cushla shared with us at my last Healthy eating on a budget cooking class on Friday 18/03/2011.

With the weather turned wet and cooler, signs of fall are ushering into the Southern hemisphere. Hence, it is good time to start introducing some great fall's cooking recipes. Harvested in autumn, pumpkin is a seasonal vegetable widely available at a reasonable price during this time of the year. When pumpkins are abundant and cheap, you can to try making some pumpkin puree and freeze for use in soups, pies or healthy and moist Vegetarian loaf like this. The recipe used here is originated from a grated vegetable.

For this recipe we used cooked unsalted pumpkin puree instead. The amount of flour might need to be increased a little to compensate for the extra wetness. For a variation of this appetizing vegetarian loaf, one can use half pumpkin puree and half grated carrot. Adjustment to sweetness of the loaf much depends on the type of vegetable used. If grated carrots are used then use less sugar, however add more sugar if using courgettes.

To serve, slice and butter or ice with a fresh lemon or top with orange juice icing. You can also convert this pumpkin loaf into pumpkin muffins by baking in muffin pan instead. This tasty quick bread is great to serve in kids' lunch box. It is also a brilliant way to disguise vegetable to get veggie-hater like my son to eat veggie!

Sweet Pumpkin loaf   南瓜疏菜面包 -featured in Group Recipes 30/03/2011


SWEET PUMPKIN LOAF


INGREDIENTS:
A
1 cup grated pumpkin/pumpkin puree/ carrot or courgette
1 large or 2 small eggs
½ cup soya oil
½ to 1 cup raw sugar
1 tsp vanilla essence


B
1 cup each whole meal and white flour
½ tsp baking powder
½ tsp baking soda
1 tsp cinnamon or mixed spice
Pinch of salt
½ cups chopped walnuts, sultanas or other dried fruit (optional)

METHOD:
  1. Preheat oven to 180C.
  2. Whisk all ingredients A in a large bowl.
  3. Shift flour in and then add all ingredients B into the bowl and mix well.
  4. Baked in a greased loaf tin at 180C for 60 minutes or until test doneness with a skewer comes out clean.
Tips:
The Making of Pumpkin Puree
Cut pumpkin into even sized pieces and steam until tender. Drain, cool then remove skin and scoop flesh into processor or bowl. Purée or mash into a smooth puree. Freeze to store.


南瓜疏菜面包

容易,简单又健康的素食谱。

材料:
A
1
杯磨碎的南瓜/南瓜泥/胡萝卜或青瓜
1
粒大号鸡蛋或2粒小号鸡蛋
半杯豆油
半至1杯糖
1
茶匙香草精

B

普通面粉和全麦面粉各1
半茶匙发酵粉
半茶匙小苏打粉
1
茶匙肉桂粉或混合香料粉
少许盐
½杯切碎的核桃,葡萄干或者其他干果(可选)

方法:
1)把烤箱预热到180C摄氏。
2
)把所有A成分搅拌在一个大碗里.

3)筛面粉进碗中后加入所有B材料拌匀。倒入抹油的烤盘.
4
)放进预热了180C摄氏烤箱烤60
分钟或直到用竹串测试取出来干净为止。

提示:
南瓜泥制作:
南瓜切成均匀大小块,蒸直到熟。沥干水后取出冷却,去皮取肉捣碎成泥。

Sunday, March 27, 2011

Baked Pasta with Bacon & Pumpkin 南瓜培根焗意粉


The Pumpkins Series – Part 1

Farewell Healthy Eating on a Budget cooking class

Last Friday 18/03/2011 was my last day to attend this cooking class. As I mentioned in this Christmas posting, I had joined this class since November 2009. Ever since then I had been looking forward to the last Friday of every month to attend the class. I had amazing new experiences and tons of cooking fun here. I'll definitely miss these and the friendly group of people I met here. I especially enjoyed our tea break when we all had a cuppa, happily chatting and tasting new dishes that we had just learnt.

On this final class, I had brought my camera to snap as many photos as I could to cherish the happy moments I shared with these lovely ladies.

Happy family of Healthy Eating on a Budget

Posing with Cushla (1st right) and her sisters

Once again, I would like to take this opportunity to thank North Shore Women center for being a fantastic organizer, actively promoting various workshops ranging from cooking, art crafts, health talks, counseling support groups and even Tai Chi class to local women society, it is definitely a woman's place to be. In addition to this healthy eating on a budget cooking class which has broaden my comfort zone to try out Western Cuisine, I also had wonderful learning experience in their Tai Chi class.

For this class, our charming cooking facilitator Cushla had introduced us to pumpkins. She shared with us numerous nutritious cooking ideas using a variety of pumpkins from Buttercup pumpkin, Butternut pumpkin to crown pumpkin. I would showcase these pumpkin recipes that she had demonstrated one by one, starting with this delectable baked pasta.
Baked Pasta with Bacon & Pumpkin 南瓜培根焗意粉- Featured in Group Recipes 28/03/2011
Final garnishing with my home grown spring onion before serving

BAKED PASTA WITH BACON & PUMPKIN

Serves with steamed broccoli and mini Feta Pumpkin bread

INGREDIENTS:
375g packet large spiral or penne pasta
450g butternut pumpkin, peeled and cubed
2 Tbsp Olive oil
*5 bacon rashers, rind removed chopped
2/3 cup chicken stock
2/3 cup evaporated milk
½ cup grated low fat cheese (eg.Edam)
Garnish with chopped parsley
(Serve 4)

* Choose bacon pieces instead of rashers as an exonomical alternative, or use 2 sliced chorizo sausages for a spiecier version.
METHOD:
  1. Preheat oven to 200C, grease a 7 cup oven dish.
  2. Cook pasta in boiling salted water until tender, drain and transfer to prepared dish.
  3. Cook pumpkin in a saucepan of boiling water for 3-4 min or until tender then drain.
  4. Heat oil in a large frying pan over moderately high heat.
  5. Add bacon, sauté and stir for 3-4 min or until browned.
  6. Add pumpkin toss to coat and season with pepper.
  7. Transfer bacon mixture to dish with pasta
  8. Whisk stock and milk in a medium jug, pour over pasta mixture and stir to combine.
  9. Sprinkle with cheese and bake for 10-12 minutes or until golden and bubbly.
  10. Sprinkle with parsley and serve immediately with a green salad or steamed beans or broccoli.
南瓜培根焗意粉
材料:
375克大螺旋
意粉或penne 意粉
450克白胡桃南瓜,去皮,切块
2汤匙橄榄油
5培根火腿,除去皮,切碎
2 / 3杯鸡汤
2 / 3杯淡奶
半杯低脂奶酪,磨碎(eg.Edam)
装饰用的香菜,切碎

方法:
1)烤箱预热至200℃,用可装7杯水份量的烤盘,抹上
一点油备用。
2)烧水加盐煮
意粉至熟,沥干水,倒入备用的烤盘。
3)烧另一锅水加入南瓜煮3-4分至熟,沥干水。
4)用中度高温烧热油加入培根,爆香搅拌3-4分钟。
5)才加入南瓜拌炒后加入胡椒粉调味。
6)把培根,南瓜和
意粉倒入烤盘里。
7)把鸡汤和淡奶轻轻拌打后,倒入在
意粉中搅拌均匀。
8)撒上磨碎的奶酪烘烤10-12分钟或至金黄色起泡。
9)撒上香菜配上沙拉或蒸熟豆类或花椰菜即可食用。

Wednesday, March 23, 2011

Hokkaido Milky Loaf 北海道牛奶土司


Famous milky bread from Japan, right here in New Zealand!

Last Sunday morning, the online bidder for our fridge finally came to collect her winning bid. Without a fridge, we had to clear our frozen food stuff. Fortunately there wasn't much frozen food in it as I started to control my buying since last week. Thankfully, we had a good friend, Cheng Ee's family staying just a few doors away that I could ask to store some of the frozen meat.

While emptying the freezer, I noticed there was a packet of flaky puff pastry with only 2 sheets of pastry left. Seeing that, I decided to finish off the pastry by making egg tarts for desserts. That Sunday night, hubby's friend Chen Ming and family offered to throw us farewell dinner at our house with Roast duck takeaways, these egg tarts would be perfect dessert to thank them in return.

To make egg tarts I needed to have fresh cream, which was the main ingredient for egg tart filling (you can check out my egg tarts recipe here). But the standard size of a small bottle of fresh cream here is 300ml which was too much to finish for the number of egg tarts that I was going to make with only 2 pastry sheets left. Considering no fridge to store the left over fresh cream, I had to consume this cream on the same day. Since I had to heat up the oven to bake egg tarts, I thought I might as well work on another baking recipe to use up the fresh cream.

I ended up having a real busy baking day instead of a relaxing Sunday. Thank god, the egg tarts turned out well too.

Portuguese Egg Tarts
When I was thinking hard what to bake using this fresh cream, it crossed my mind to give another attempt to make this Japanese milky loaf. I had tried to bake this recipe last year but it did not turn out well. The texture of the bread was not soft and fluffy as it should be but it was too dense. I suspected the dough was under kneaded at that time. I had shared this failure of bread making here.

This Tangzhong (Water Roux) recipe was again adapted from Christine's Recipes. The technique of kneading milky bread was not much different from other Tangzhong breads which I shared here.

The only variation was the ingredient of using fresh cream and milk in replacing water, which was why they called milky loaf. As the name suggested, this bread originated from Japan and the actual recipe used Hokkaido's Furano fresh milk which obviously was not available here. For this recipe, I used local fresh milk and cream instead, so maybe I should rename it to Kiwi Milky loaf instead J

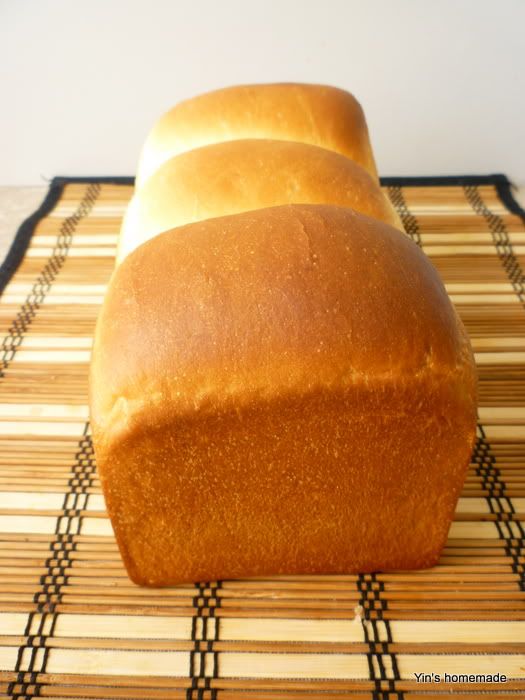
I baked this loaf using a good quality bread pan, a gift from Cheng Ee. The loaf was beautifully baked and easily taken out from the tin.

Before glazing

After glazing with butter

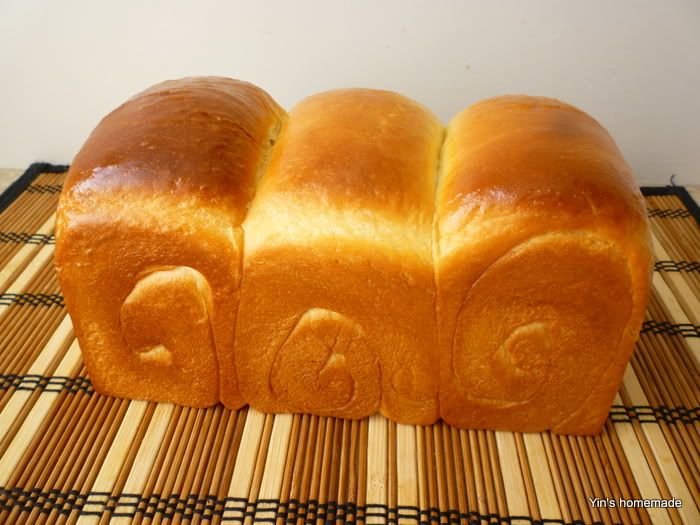
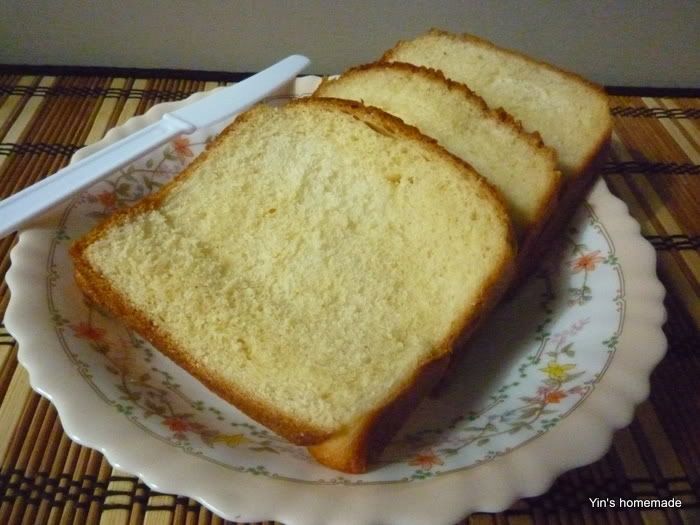
That evening, I gave 2/3 of the loaf away to Cheng Ee and Chen Ming without tasting them. I was quite confident the bread tasted good, this was because when I sliced the bread, I felt the texture of the bread was just right - soft and fluffy.


Hokkaido Milky Loaf 北海道牛奶土司
 I only tasted the bread the following day. I was surprised to have hubby to be the first person to taste it. I was overjoyed when he told me the bread was awesomely good with strong milky flavor and nice to eat just like that. This comment was very encouraging to me especially from a non-bread eater. J


HOKKAIDO MILKY LOAF
Featured in Group Recipes - 23/03/2011
Ingredients

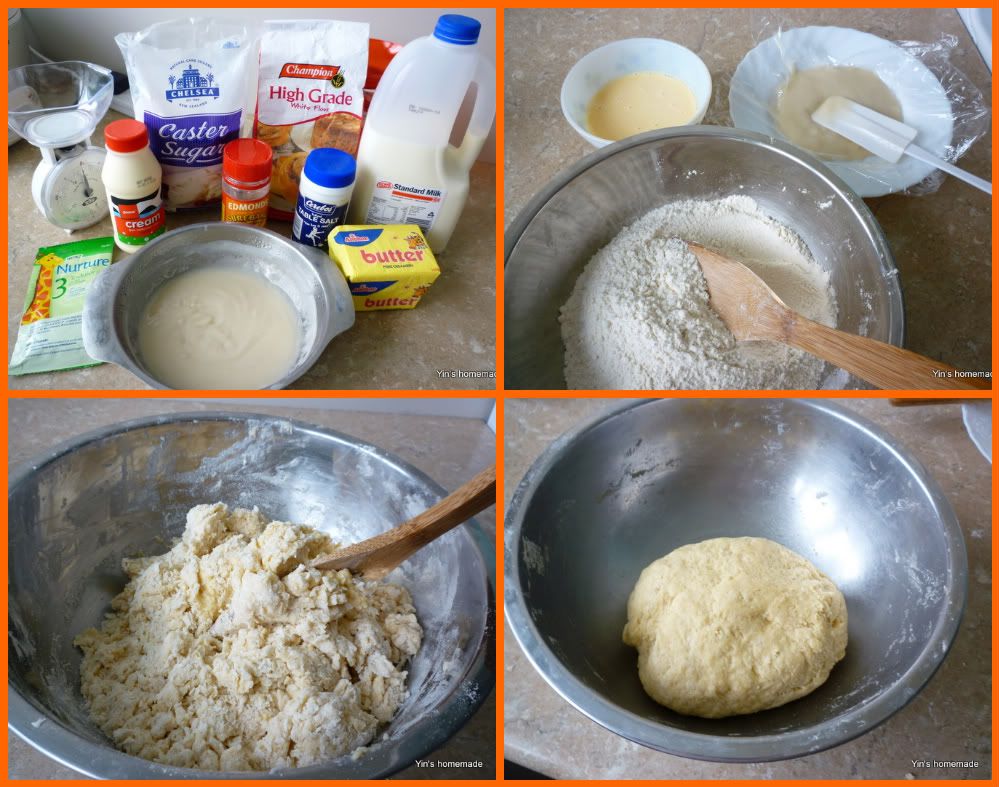
A
450 gm high grade flour (bread flour )
75 gm caster sugar
5 gm salt
8 gm milk powder (optional)
10 gm instant dry yeast
B
1 egg
50ml milk
50ml fresh cream
150 gm Tangzhong (refer here for making tanzhong, substitute water with milk)
C
40 gm butter ( softened at room temperature)
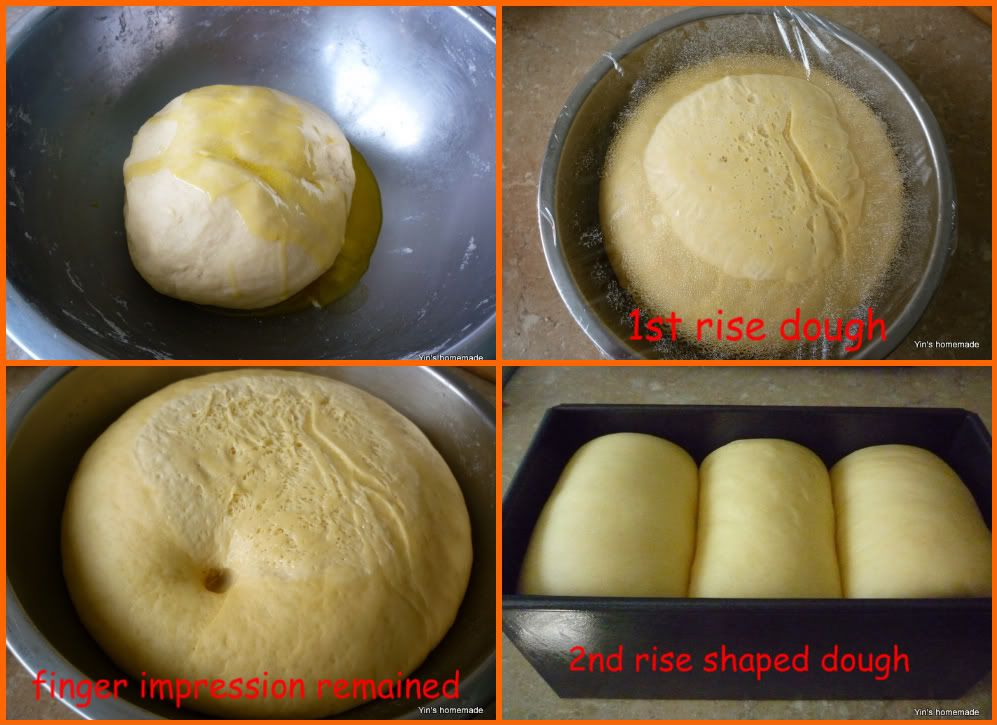
Method:
  1. Combine all dry ingredients: flour, salt, sugar and instant yeast in a bowl. Make a well in the center.
  2. Whisk and combine all wet ingredients: milk, egg and Tangzhong, then pour into the well of the dry ingredients.
  3. Knead until you get a dough shape and gluten has developed about 10-15 minutes (hand knead), and then knead in the butter.
  4. If you hand knead like I do, do expect to deal with gooey dough at this stage. You can opt for bread maker if you have one.
  5. Keep kneading until the dough is smooth, not sticky and elastic. The time of kneading depends on how hard and fast you knead. I used to set the timer to 15 minutes to monitor my kneading time.
  6. Test if the dough is ready by stretching the dough with two hands. If it forms a thin "membrane" that's very elastic in texture. That means you have successfully kneaded the dough to a perfect stage.
  7. If you use bread maker then add wet ingredients into bread maker first, then followed by the dry ingredients. The yeast is the last to add.
  8. Knead the dough into a ball shape. Place in a greased bowl and cover with a wet towel or cling wrap.
  9. Let it proof till it's doubled in size, about 2 hours. Use finger to test doneness. Poke in and if finger impression remains, this confirms the dough is nicely proofed.
  10. The time will vary and depends on the weather. The best temperature for proofing is 28C. You can place a cup of water in microwave and heat at high for 2 minutes to create a warm spot, once done then place the dough in to proof.
  11. Transfer to a clean floured surface. Deflate and divide the dough into three equal portions. Knead into ball shapes. Cover and let them rest for 15 minutes.
  12. Roll out each portion of the dough with a rolling pin into an oval shape. Fold 1/3 from top edge to the middle and press. Then fold 1/3 from bottom to the middle and press. Turn seal downward. Roll flat and stretch to about 30cm in length. With seal upward, roll into a cylinder. With seal facing down, place in the loaf tins to have the 2nd round of proofing.
  13. Brush whisked egg on surface of dough or lightly spray water on the shaped dough. Bake in a pre-heated 180C (356F) oven for 25 minutes, or until golden brown. Transfer onto a wire rack and let cool completely.

北海道牛奶土司
这汤种面包法也是改编自我喜爱的美食博客基絲汀簡易食譜。牛奶味特别浓厚的超软土司,你会吃不停口!


材料:

A
450 克高筋粉
75 克糖
5 克盐
10克快速酵母(Instant Dry Yeast)
8克奶粉 (增加香味,可不加)
B
60 克全蛋液 (一粒七号蛋)
50毫升牛奶
50毫鲜奶油/鲜忌廉
150 克汤种 (做法参考此食谱,汤种用牛奶替换水)
C
40克牛油(奶油,置室温放软) (待面团起筋,即成团后,才加入)


做法:
面包机做法:
把所有材料(除牛油外)依次倒进面包机(先放湿的材料,然后才放干的材料):牛奶,蛋,汤种,盐,糖,奶粉,高筋粉,最后放酵母。我习惯在面粉中央拨开一小洞,把酵母放进去。
选择面包机的basic功能,材料搞拌至成一面团,就放进已融解的牛油,继续搞拌,成一光滑面团。 测试面团搓到是否合格程度,面团可张开成一薄膜,而且坚韧即成。当面包机停机,等待面团第一次发酵完毕,见面团发大两倍就取出。


手搓麵粉做法:
把所有A&B材料放入一盘中,酵母不直接接触到盐和糖就可以,以免酵母脱水死亡。搞拌至成一面团, 搓成有弹性和筋膜的面团。要有心理准备,面团会很胶粘的坚持搓下去,搓至完全光滑大约15分钟。加入软化的牛油再搓15分钟有至弹性,面团可张开成一薄膜即成。跟着用保鲜膜盖好,作第一次发酵,至面团发大两倍约2个钟头。用手指测试,如果手指戳的印象仍然存在,这印证了面团发得很好。


放在清洁的工作台上,用手按压面团,挤出空气。切割成3个等份,滚圆,收口朝下。用保鲜膜盖着,静置15分钟。用木棍把每个小面团从中央向外滚成椭圆形。从上向下折1/3后,压紧。再从下往上折1/3后,压紧。将收口朝下,把面团上下压长,约30cm,翻面卷成圆柱形。收口朝下,放入面包模中进行最后发酵盖上保鲜膜或湿布进行最后发酵,至两倍大,约60分钟。
涂上蛋汁或轻轻喷一些水,放入预热至180C (356F) 的焗炉中,焗约25分钟,直至转金黄色为止。放在铁架上放凉,即成。

Monday, March 21, 2011

Dino Banana Chocolate Chips muffins

Wanna share muffins with T-Rex?

Ming Ray's school PTA organized a fund raising garage sale last Saturday 19/03/2011 and every student was requested to bring in a box of bakery for sale. In addition, each student was also asked to decorate the cake box. There would be a prize for the best decorated cake box. Ming Ray was very excited with this project when he took back the box. At home, other than playing his Lego, his favourite past time was craft works. With the box, he had been pestering me to work with him. Finally, we started to work on this little project Thursday afternoon after school.

With his usual fanatic love for dinosaurs, Ming Ray wanted his cake box to be decorated with dinosaur features. He suggested drawing and painting the four sides of the box with dinosaur eras in chronological order from Triassic, Jurassic to Cretaceous periods with volcano eruptions. Instead of working from scratch, I stumbled upon an idea to recycle dinosaur features from his old dinosaurs diorama which he made the year before.
Ray's Dinosaur Diorama - made in 2010
I asked him to use pencil to draw out his ideas around the box and assisted him in mixing up water colours for him to paint. As for the main top of the box, he wanted to paint four striking colour of red, blue, yellow and green stripes. I then suggested another idea to recycle old pipe cleaners to make some words and stick on the top of the box.

So, here is my lovely boy's master piece:

Ray's cake box
4 sides of the cake box designed with dinosaurs era
What had mommy baked to fill up the box? The words on the box say it all J

T-Rex: I wanna a piece too!
Yes, I had baked Ming Ray's favourite banana chocolate chips muffins.


Looking for this simple and easy recipe? It's from an old recipe I shared previously, click here.

Saturday, March 19, 2011

Hong Kong Style Sausage Rolls 港式肠仔包


Tangzhong bread again?

I was kind of into baking these days as I was trying to clear my pantry as much as possible seeing I have another bag of high grade flour (bread flour) and sugar to get rid of. J

This is the second version of sausage rolls I had made. In the first version, I used sweet bun dough recipe which I extracted from my first baking book by Agnes Chang that I shared here. The following recipe used Tangzhong (Water Roux) method which I adapted from Christine's Recipes. Christine is my mentor in Tanzhong bread making. I had also introduced the same Tangzhong bread making technique in my previous bread making posts for whole meal bread and cottony toast bread.

Again I hand kneaded my bread dough. I was pleased to see the dough nicely doubled after two hours. It gave me confidence to expect a nice batch of fresh breads for dinner that night.

True enough, another batch of soft and fluffily textured sausage rolls out from oven just in time for dinner J
Hong Kong Style Sausage Rolls港式肠仔包
Wanna have a bite? Incredibly cottony-soft bread texture, just yum!


HONG KONG STYLE SAUSAGE ROLLS
Featured in Group Recipe - 19/03/2011


Ingredients

8 Frankfurt sausages or any kind to your liking
A
350 gm high grade flour (bread flour )
55 gm caster sugar
5 gm salt
7 gm milk powder (optional)
5 to 6 gm instant dry yeast
B
1 egg
100-125 ml milk (slowly add in, stop adding if dough too gooey)
120 gm Tangzhong (refer here for making tanzhong)
C
30 gm butter ( softened at room temperature)

Method:
  1. Combine all dry ingredients: flour, salt, sugar and instant yeast in a bowl. Make a well in the center.
  2. Whisk and combine wet ingredients: egg and Tangzhong, then pour into the well of the dry ingredients. Slowly add in milk.  
  3. Knead until you get a dough shape and gluten has developed about 10-15 minutes (hand knead), and then knead in the butter.
  4. If you hand knead like I do, do expect to deal with gooey dough at this stage. You can opt for bread maker if you have one.
  5. Keep kneading until the dough is smooth, not sticky and elastic. The time of kneading depends on how hard and fast you knead. I used to set the timer to 15 minutes to monitor my kneading time.
  6. Test if the dough is ready by stretching the dough with two hands. If it forms a thin "membrane" that's very elastic in texture. That means you have successfully kneaded the dough to a perfect stage.
  7. If you use bread maker then add wet ingredients into bread maker first, then followed by the dry ingredients. The yeast is the last to add.
  8. Knead the dough into a ball shape. Place in a greased bowl and cover with a wet towel or cling wrap.
  9. Let it proof till it's doubled in size, about 2 hours. Use finger to test doneness. Poke in and if finger impression remains, this confirms the dough is nicely proofed.
  10. The time will vary and depends on the weather. The best temperature for proofing is 28C. You can place a cup of water in microwave and heat at high for 2 minutes to create a warm spot, once done then place the dough in to proof.
  11. Transfer to a clean floured surface. Deflate and divide the dough into eight equal portions. Knead into ball shapes. Cover and let them rest for 15 minutes.
  12. Knead each part into a long tube, depends on the length of your sausages. Roll to enclose the sausage, with seals facing down.
  13. Place rolls on a tray lined with baking paper, covered with cling wrap or a wet towel. Leave for the 2nd proofing, about 45 to 60 minutes or until double in size.
  14. Brush whisked egg on surface of rolls or lightly spray water on the shaped dough. Bake in a pre-heated 180C (356F) oven for 25 minutes, or until golden brown. Transfer onto a wire rack and let cool completely.

港式肠仔包
这是我第二种腸仔包做法,第一个我已介绍过用甜面包食谱。这另一种学来的汤种面包法改编自我喜爱的美食博客基絲汀簡易食譜

材料:
香肠8条
A
350 克高筋粉
55 克糖
5 克盐
5至6克快速酵母(Instant Yeast)
7克奶粉 (增加香味,可不加)
B
56 克全蛋液 (一粒蛋)
100-125毫升水/牛奶 (慢慢加入避免面团过湿 )
120 克汤种 (做法参考此食谱)
C
30克牛油(奶油,置室温放软) (待面团起筋,即成团后,才加入)

做法:

面包机做法:
把所有材料(除牛油外)依次倒进面包机(先放湿的材料,然后才放干的材料):牛奶,蛋,汤种,盐,糖,奶粉,高筋粉,最后放酵母。我习惯在面粉中央拨开一小洞,把酵母放进去。
选择面包机的basic功能,材料搞拌至成一面团,就放进已融解的牛油,继续搞拌,成一光滑面团。 测试面团搓到是否合格程度,面团可张开成一薄膜,而且坚韧即成。当面包机停机,等待面团第一次发酵完毕,见面团发大两倍就取出。

手搓麵粉做法:
把所有A&B材料放入一盘中,酵母不直接接触到盐和糖就可以,以免酵母脱水死亡。搞拌至成一面团, 搓成有弹性和筋膜的面团。要有心理准备,面团会很胶粘的坚持搓下去,搓至完全光滑大约15分钟。加入软化的牛油再搓15分钟有至弹性,面团可张开成一薄膜即成。跟着用保鲜膜盖好,作第一次发酵,至面团发大两倍约2个钟头。用手指测试,如果手指戳的印象仍然存在,这印证了面团发得很好。

放在清洁的工作台上,洒点高筋粉。用手按压面团,挤出空气。切割成八个等份,滚圆,收口朝下。用保鲜膜盖着,静置15分钟。把每个面团分别搓成长条形视乎肠仔的长度,把肠仔卷起。如是者,把所有肠仔分别卷好,放在铺了baking paper的焗盘上。盖上保鲜膜或湿布进行最后发酵,至两倍大,约60分钟。
涂上蛋汁或轻轻喷一些水,放入预热至180C (356F) 的焗炉中,焗约25分钟,直至转金黄色为止。放在铁架上放凉,即成。

Sunday, March 13, 2011

PORK BELLY WITH SALTED VEGETABLES 咸菜焖腩肉


Hakka Cuisine

This is another great Hakka dish that I grew up with, and one of my childhood favourites my mom often cooked at home. I'm glad that now my family loves this dish too.

PORK BELLY WITH SALTED VEGETABLES 咸菜焖腩肉


The sour and salty flavor of the dish is not only great to go with white rice but also with congee which is appetizing to eat during summer time. Looking for congee ideas? Click here.
PORK BELLY WITH SALTED VEGETABLES
Featured in Group Recipes - 13/03/2011


INGREDIENTS:
1 packet of salted vegetable
400g pork slices (cut into small strips and seasoned with 1 tbsp of soya sauce)
2-3 clove garlic, chopped
2 tomatoes, cut into wedges
½ tsp of sugar (to your taste)

METHOD:
  1. Soak salted vegetable in water for about 10mins, drain & cut into strips.
  2. Slice pork belly into thin strips.
  3. Heat wok with oil and sauté chopped garlic till fragrant.
  4. Add in the pork slices & fry till half cooked.
  5. Pour in salted vegetables and stir fry then add into tomatoes wedges.
  6. Add some water to keep ingredients moist, stir-fry to combine well.
  7. Reduce heat to medium and simmer for 10 minutes before transfer to slow cooker.
  8. Continue to simmer in slow cooker for 1 ½ hour or until pork slices soft and tender.
  9. If not using slow cooker, reduce heat further and continue simmer in wok with lid for about 30min – 45min or until pork slices soft and tender. Add more water if more gravy preferred.
  10. Taste test before serving. If you find too salty then add more sugar.  
咸菜焖腩肉


材料:

一包咸菜
400克猪肉
(切成小条切,
腌一汤匙的酱油)
2-3瓣蒜头,切碎
2个番茄,切块

半茶匙的糖(你的口味)


做法:

将咸菜洗净,切小段,腩肉切片,备好蒜末。将锅中放少量油,放蒜炒出香味, 下肉片煸炒成半热时,接着放咸菜,略微翻炒后加入蕃茄加入少量水再炒均匀,加盖焖10分钟后才加调味,盛出倒入慢炖锅继续焖至少一个半钟头或至肉柔嫩。
如果不使用慢炖锅,减少热量加盖继续在镬约30 - 45分钟,或直至猪肉片柔嫩。如果喜欢更多汁多补充水分。

Friday, March 11, 2011

ROYAL SHORTBREAD COOKIES 奶油酥餅


Cookie dunk?

I had this recipe since last Christmas when I attended my monthly budget eating cooking class, which I already shared in my Christmas High Tea post, but never attempted to make it until now. 

Frankly, I'm not a sweet tooth person, I seldom eat sweet biscuits but love to eat savory cracker dunk with hot chocolate or coffee. However I do sometimes like buttery biscuits, especially round tin Danish butter cookies. When I first tasted shortbread in that high tea, the strong buttery flavor and the texture of the biscuit melted in the mouth gave me very close similarity to Danish cookies except it was not so sweet which was more to my liking.

Finally, when I saw that I still had blocks of butter to clear off and my hand mixer was due to be sold off with less than 3 weeks time to return to home country (we are now gradually selling off our electrical appliances online), I made my first batch of cookies.

The recipe that I shared was the combination of two recipes from my cooking class and the techniques from Joy of Baking. As my boy Ming Ray loved chocolate, this Royal shortbread cookies by Joy of Baking with one end of the baked shortbread dipped with melted chocolate was just right for his taste.

The next day was Ming Ray's swimming sports day and the school invited parents to join the children for picnic lunch. I brought along the cookies to share with his school friends and parents. I was so pleased that my first attempt in cookies making received very good feedbacks.


I love to dunk these cookies in mocha coffee, would you care to have a cuppa with me? J


Royal Shortbread - Shortbread with chocolate dipping

Shortbread cookies featured in Group Recipes - 10/03/2011


ROYAL SHORTBREAD COOKIES


INGREDIENTS:
220g butter, room temperature
3/4 cup icing sugar
3/4 cup corn flour
1 ½ cups all-purpose flour
1 teaspoon pure vanilla extract

For Chocolate Dipped Shortbreads:
180 grams semi sweet or bittersweet chocolate, finely chopped

METHOD:
  1. Cream butter and icing sugar. I used hand mixer to beat the butter until smooth and creamy. Add sugar and beat until smooth and beat in vanilla extract. 
  2. Add sifted flour, corn flour and mix thoroughly with the creamed butter mixture until it forms dough.
  3. Flatten the dough into a disk shape, wrap in plastic wrap, and chill the dough for at least an hour or until firm. 
  4. Preheat oven to 180 degrees C with the rack in the middle of the oven.
  5. Knead dough and then roll out the dough about 10mm thickness on a lightly floured surface.  Cut into shapes as desired using cookie cutter.  
  6. Place on prepared baking sheets and place in the refrigerator for about 15 minutes. This will firm up the dough for cookies to maintain their shape when baked.
  7. Bake for 8 - 10 minutes, or until cookies are very lightly browned. Cool on a wire rack.
For Chocolate Dipped Shortbreads:
  1. Place finely chopped chocolate in a heatproof bowl and place it over a saucepan of simmering water.
  2. Once the chocolate has melted, remove it from the heat.  
  3. Taking one cookie at a time, dip one end of each cookie in the melted chocolate and place it on a baking paper lined baking sheet. 
  4. Once all the cookies have been dipped in the chocolate, place the baking sheets in the refrigerator for about 10 minutes, or until the chocolate has hardened.
Tip:Shortbread cookies that keep in an airtight container can last for about a week or they can be frozen.

奶油酥餅

這個餅乾只用很多酥油而沒有水份,所以做出來的餅乾很酥脆,十分適合當做下午茶的茶點。

材料:
220克牛油,室温
3 / 4
杯糖粉
3 / 4
杯玉米粉
杯面粉(中筋麵粉)
1
茶匙纯香草精

巧克力酥饼:
180克半甜巧克力或苦甜巧克,切碎

作法
1。用搅拌机搅拌牛油和糖粉。先把油搅拌,分次加入糖粉打发至膨胀变白才加入香草精。
2
。将面粉和玉米粉一起筛过后加入奶油搅拌混合均匀面团。
3再把面团压扁成盘形,保鲜膜包装,放冰箱冷藏1小时以上。
4。先预热烤箱至180摄氏度将中间架烤箱中的。
5。面团取出后稍回温再擀成1公分厚片,以餅乾壓模壓切成形。
6。放置在冰箱的地方约15分钟变硬定型保持其形状。
7
排入垫烤盘纸的烤盘8 - 10分钟,或烤至表面呈现浅浅的金黄色取出放在冷却架上冷却
巧克力酥饼:
將巧克力碎片放進大碗中,然後把碗放進一鍋滾水裡,隔水加熱溶化巧克力碎片,邊加熱邊攪拌,感覺一半的碎片開始溶化即可取出(勿加熱太久),繼續攪拌,碗裡的餘熱會溶化剩下的巧克力,全部溶化之後,繼續攪拌直到巧克力漿滑順且表面發亮。
将饼干一半蘸于溶化的巧克力后放置在烤纸上。一旦所有的饼干蘸了巧克力,放进冰箱约10分钟,或直至巧克力变硬。

温馨提示:
饼干收在一个密封的容器可保持一个星期左右,也可以被冷藏

Tuesday, March 8, 2011

Bird’s Eye Chilies 指天椒


Spice up in garden and kitchen

When I first moved to Auckland, the vegetable that I couldn't get over was chilies. The fresh chilies here were so expensive costing nearly $1 for a single big red chili. Furthermore, these fresh chilies were not spicy enough and did not give the kick I was used to. I suppose this was largely due to the cold climate here as chili likes hot climate. Then I discovered frozen chilies were far cheaper than the fresh ones. To try out I bought a packet of bird eye's chilies which were imported from Vietnam.

I like to eat noodles with chilies. So, I tested out these chilies by making simple soya sauce with chilies dipping sauce. I took out 3 small chilies and cut into tiny pieces and soak with soya sauce. At first, I was a bit skeptical whether the frozen chilies could give much spiciness. But when I just ate a spoonful of noodles with a tiny chili piece in it, I could already felt the hot burning effect on my tongue! Frankly, I was a person that could eat really hot spicy food and this chili to me was really HOT! I gave a thumb up for it. If anyone is looking for hot chilies then bird eye's chilies from Vietnam is my recommendation.

Kiwis have strong eco-friendly awareness. Seeing almost every household garden produces some fresh food for own use, I too embarked on a gardening journey. As mentioned in my green hopes page, most of my plants were grown from seedlings given by my friends and landlady. Once I saw my garden began to grow and flourish, it gave me much confidence that I might have the required green fingers to do more. With that, I challenged myself to grow more plants from seeds.
 I began to surf internet on gardening and ways to sow seeds. Then I came across a video clip showing a great way to sow seeds by using damp towel paper. This method allows you to see the seeds germinate before transferring them into soil which was more encouraging than planting straight into the soil and not knowing whether the seeds were good enough to germinate. After seeing the video clip, it gave me an idea to try out sowing the frozen Vietnamese chilies seeds since I liked the chilies so much.
 On 21/01/2010, I took out about a dozen seeds from a frozen chili and spread them on a damp kitchen towel paper. Then I placed the paper into a zip lock bag and inflated the bag by blowing some air into it before sealing it up. As chili seeds needed warm spot to germinate, I kept the bag on top of the boiler in the water boiler room to ensure constant warm temperature. After 10 days (normal seeds germination period was 8-10 days), I was really overwhelmed to see out of dozen odd seeds, 2 of the seeds did germinate. I did not have high hope on these seedlings because they might have been frozen for quite a long time already.


From 01/2010 to 12/2010
Seeing the seeds started to sprout, I carefully transferred them into a small pot and carefully watered them using the rice water rinsed from the cleaning of rice in my daily rice cooking. This rice water had nutrients and a great source of organic fertilizer, some knowledge I acquired from my mother. When I was young, I used to see her watering our garden using the water she collected after cleaning fish and rinsing rice. She seldom used commercial fertilizer but our garden thrived as if the plants had been well fertilized.

However, the sowing timing was not right; I was s a bit too late in sowing the chilies. Warmth is the biggest key in successfully germinating the chili. By the time these chilies started to sprout and grew in February, the weather had started to chill. With the weather turned chilly, these two chili plants seemed stagnant in their growth even though I placed them in warm sunny spot on my balcony. Nevertheless, I didn't give up on them and kept watering them. One of the chili plants kept growing but another did not and remained at about 3 inches height only and did not seem very hopeful.

Finally when the winter was over and after my landlord revamped our back yard in December 2010, I started to cultivate another new veggie garden. Seeing the two plants had not grown much in the pots, I decided to give a final try by removing these chili seedlings from the pots and transferring them to ground. To my surprise, the bigger seedling didn't survive but the smaller seedling which I thought couldn't survive grew healthier and healthier and it even flourished and fruited by this summer!

02/2010
Fruited @ 03/2010

It turned out that of my 2 years gardening experience in the Kiwi land, this Vietnamese bird's eye chili tree is one of my most successful plants that I had planted. It has taken me nearly a year to grow from a frozen seed to now a full grown chili tree. J

Wednesday, March 2, 2011

Curry Laksa Noodles/Curry Mee 咖喱叻沙面

I should have posted this earlier but I was trying to tie in the Chinese New Year moods by showcasing CNY related dishes first hence it was archived until now.

24th January 2011 – Cockle Picking with Auntie Lan


After our road trip we had only 3 more days before Auntie Lan would head back to Malaysia for Chinese New Year celebration with her siblings. In order to let Auntie Lan experience a true blue Kiwi holiday in Auckland, we brought her to one of Auckland's interesting summer activities – sea shells picking. It has been a while since our last cockles picking trip to Okoromai Bay, Shakespear Regional Park in October 2010. Cockles picking was best done at low tide. Despite knowing the low tide time for the few days was quite late at 6.30pm we still went for it.

We had only an hour to spare for real cockle picking before the day turned dark and for not wanting to reach home too late in the evening. However, this time we were more experienced and within a short time we had collected more than 200 cockles. This time the sizes of the cockles were much bigger than the last time we came here. As we were only allowed to bring back 50 cockles per head, happily we came home with a bucket of 200 cockles. Seeing both Auntie Lan and Ming Ray both enjoyed themselves very much, we were delighted to declare "Mission accomplished!" J


Now what to do with these 200 cockles? Well, this was what we decided – Penang famous Curry Laksa noodle or Curry Mee. Initially, Auntie Lan wanted to make own curry gravy but to spare her from the hassle of grinding chilies, I advised to use ready made curry paste.

I used Tean's Gourmet Malaysian Curry Laksa Paste, this curry paste was imported from Malaysia and easily available in Auckland Asian food stores. I had used it for curry chicken once. It tasted really delicious and the colour was very nice. Not to mention it was so easy to prepare. May be I should claim advertisement fees from the supplier, hahaha…. J


Curry Laksa Noodles (Curry Mee) 咖喱叻沙面 - Featured in Group Recipes 02/03/2011 
Blanched cockles

Below is the short cut version of Curry Mee recipe, just grab a few main ingredients; Curry paste, seafood, noodles and coconut milk. For the people of Penang living overseas, it may even help cure your homesick taste buds by making one of Penang signature hawker street food - Curry mee!


Curry Laksa/Curry Mee
Penang signature hawker food - Curry Mee


Ingredients:
A packet of readymade curry paste – I used Tean's Gourmet Malaysian Curry Laksa Paste
Shelled blanched cockles or clams
Prawns, squids, fish cakes, fish balls (any other seafood of your choice can be added)
200g Fried soya bean cubes/toufu pok (halved or quartered)
200g blanched bean sprouts
300g blanched Yellow noodles
300g blanched Vermicelli/ Bee hoon
400ml coconut milk ( one tin)
Water or Chicken Stock (depend on the thickness of the soup you prefer)
Salt (to taste)

Method:
  1. Blanched cockles or seafood of your choice, noodles, vermicelli and set aside. 
  2. Heat 4 tbsp oil to sauté the curry paste till fragrant.
  3. Pour in coconut milk; add in chicken stock to the thickness of the soup you prefer. Add in toufu pok and bring to boil. Stir and add in salt and taste test.  
  4. When soup comes to a boil, add prawn and other seafood then bring to just boiling point.
  5. Remove from fire and use curry gravy as a soup for the yellow noodles and vermicelli.
    To serve:
  6. Divide fresh yellow noodle and bean sprouts into individual bowls arrange seafood on top. Pour curry gravy and taufu pok over and serve immediately.
Delicious Seafood Curry Laksa noodles

咖喱叻沙面
主要材料:

一包现成的咖喱酱- 我用田师傅咖哩雞即煮醬料

300克黄面条(烫熟)
300
克米粉(烫熟)
400
毫升椰奶
水或鸡汤(取决于你喜欢汤的浓度)
盐(适量)

可随意变化的材料
200克豆芽
去壳蛤/蚶(烫熟)大虾,鱿鱼,鱼饼,鱼丸(您可以选择任何其他海鲜)
200
克豆腐卜(切半)
方法:
1。热4汤匙油,爆香咖喱酱。
2
。倒入鸡汤椰浆,加入豆腐卜煮滚。搅拌,加入盐后测试口味。
3
。当汤再烧开,加入虾等海鲜,煮滚。
4
。将烫熟的面条,米粉和豆芽分别装入碗中,上放海鲜,后淋上滚烫的咖喱汁和豆腐卜趁热享用。

LinkWithin

Related Posts with Thumbnails